I have been a long time supporter of both the ’70s* and the ’90s**, at least in terms of fashion. And although my love of the ’90s died down a bit as my love obsession with the ’70s grew, I still did fancy the style of the ’90s. I may have a bit of a selective viewpoint, I tend to ignore the less than pretty when it comes to fashion, but I still do think there are plenty of great things that came out of the ’90s. I for one am obsessed with space buns. It’s likely I’ll be doing them a lot more, AKA every other day for the next week month. So to pay homage to my favorite parts of the ’90s, I’ve got a 3 part series an at least 3 part series, (I have ideas for 3 posts already, and there might be more to come, who knows?) that I’d like to introduce today. It’s a bit of a fun one in my opinion, that I could really do with any style of fashion that I become obsessed with.
* I debated whether the suede skirt or denim skirt was better in one blog post. In another I wore a suede skirt and a chunky sweater for an OOTD. Quite a lot of ’70s I must say.
**In one blog post I made a guide to dressing like a ’90s girl, which was very well liked. In another I made a ’90s inspired/Lisa Frank inspired Sticker Clutch for a DIY. And in yet another I styled overalls in an OOTD, and included my inspiration. I know, I’m obsessed. And this is only what’s documented.
So far, as I said, there’s 3 parts to this series. I can only introduce the parts as I go along, but I do think you’ll like them. The first post is one of the more simple ones, but I’ll ease you into things as we go along, for the last post may be a full-fledged photoshoot, you never know.
It has come to my attention that space buns were a pretty big part of the ’90s, at least for pastel goths, and a for those who embraced the grunge of the decade. I’d seen them around the internet, but I was not aware that this hairstyle had originated in the 1990s, which truthfully, only made me love the time period even more. And when I was searching for how to do these space buns, I came across girl, after girl with hair practically long to be considered Rapunzel’s. Now that might be a bit of an exaggeration, but not much. I only stumbled upon 1 or 2 of these space buns for people with shorter hair, and they were no where near as popular as the girls’ tutorials with longer hair. At first it had me thinking that my space buns would just have to be puny and small, and frankly, quite sad looking. But I did come across a way to do this if you have shorter hair, and I think it’s worth sharing, despite the simplicity.
Space Buns (for Short Hair) Tutorial
Caution: People may compare you to Princess Leia at every chance they get. This is not a bad thing I suppose, and it is quite often followed by a compliment. Just a warning.


Step 1 // Prepare Your Sock Buns
For space buns for shorter hair, you’ll use a technique similar to the one used to make sock buns. This means that you can use the proper “bun ring” made of the net material found at the stores, but a sock works the same way. You’ll just need to cut the toes off of a sock in a color similar to that of your hair, and roll it up like a donut. The larger/thicker the sock bun, the bigger your bun, and the less hair you’ll wrap around it. The smaller the sock bun, the smaller your bun, and the more hair you’ll wrap around it. It all depends on what you want. Make two of these.

Step 2 // Part Your Hair
This step seems fairly self explanatory, but it is essential to the entire look. Part your hair down the middle of your head, all the way to the nape of your neck. Be sure to make this as even as possible, so that your space buns are balanced.


Step 2 // Put Your Hair in Pigtails
This step is partly up to you: the pigtails will need to be high, and around the same place as your ears, but how high up, and how far back is really up to you. I prefer mine a tad bit behind my ear, and about an index finger about the tip of my ear. Do what you like, but make sure that your pigtails are even, so that your buns are.


Step 5 // Place Your Hair Through the Sock Bun
You need to take your pigtails, and put it through the little hole of the sock bun. This is by far the easiest step, and the most self explanatory, so I guess I’m done now…


Step 6 // Fan Your Hair Around the Sock Bun
This is where the technique varies from that of a typical sock bun. You will fan your hair around the sock bun, so that it lays on top, and covers every area of the sock. However, instead of tucking your hair into the sock, you will stick an elastic over the sock and your hair, to hold the hair around the sock. The pictures might help this make more sense.


Step 7 // Wrap Your Hair Around the Sock Bun
After placing your elastic around your hair, there will be extra bits and bobs sticking out. That’s OK! In fact, it’s necessary. Now you’ll need to take the extra bits of hair, and gather them. Take the large piece of hair, and wrap it around the sock, where your head is. Once again, the pictures (and possible GIF, which I could add later) will help this make sense.

Step 8 // Secure the Wrapped Hair
Use another elastic to put around the wrapped hair to secure it in place. At this point the elastic no longer stretches around my hair, because it’s so thick at the moment, but it should for most people. If not, just use a ponytail holder in the same color as your hair.


Step 9 // Enjoy Your Space Buns
I am quite in love with this hairstyle, and especially love when I see people with pastel hair colors do it. I’ve also seen one really cool picture where the roots of her hair where the part was had glitter all over it. I thought that would look really cool, but I couldn’t do that for this post. If you can though, I’d recommend it!
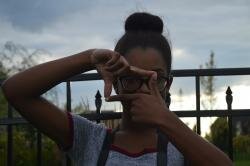
After you’ve put in your space buns, it’s definitely time to embrace your ’90s hair.
But just you wait, there’s more ’90s coming your way.
A DIY is all I can say.
So goodbye for now,
I’m afraid that I must bid you a farewell.
^^^Enjoy my makeshift poem. It started out as to sentences that rhymed and turned into the next Cat in the Hat ;)^^^
OK then! I’m afraid that’s the end of the post, but not the end of the series. I had planned for some more ’90s fun, but then this turned into a 1200 word post, and I know that 2400 words would not get read by me, so I wouldn’t force it onto anyone else. That’s why this post is so image heavy, to try and counteract all the words. I hope it’s balanced for you. I’ll try to have another part of this series up next week, but bare with me. 1200 words is a lot to write, and I still have to take pictures.
P.S. Read the tutorial for the ’90s inspired hair clips here, and stay tuned for more in this series.